Fresh Corn & Tomato Salad

Today I have a quick and easy side dish for you. While other recipes are still waiting in line to get on the blog, this one I made just last week. I wanted to share it with all of you before fresh corn becomes too out of season. The good part about now is that fresh heirloom tomatoes are cropping up in supermarkets.

I’m sure you could use thawed frozen sweet corn in this recipe, but using fresh corn off the cob gives this salad a little something special.

20120920-110258.jpg

Sorry the picture isn’t fantastic, I was hungry! But I promise that it is delicious! You can even eat it as a light lunch. Add some of your favorite beans for a little protein kick.

If you don’t like goat cheese (which I know a lot of people don’t), feel free to add in fresh mozzarella pieces or leave out the cheese all together.

Fresh Corn & Tomato Salad
(Serves 4-6)

4 ears of sweet corn cut off the cob or thawed frozen sweet corn (about 2 cups)
1 lb. heirloom tomatoes, cut into 1/2″ chunks
1 small sweet onion, thinly sliced
5 basil leaves, thinly sliced
2 oz. goat cheese, crumbled
Olive oil
Salt & pepper

In a large bowl combine corn, tomatoes, onion, a drizzle of olive oil and salt and pepper to taste. Allow to sit for an hour in the fridge before serving.

Just before serving, add fresh basil. Mix well. Top with goat cheese and serve cold or at room temperature.

Easy enough, right?

Tagged , , , , , ,

Twiced Baked Classic

Ever eat twice baked potatoes? I ate them rarely when I was younger, but whenever I see pictures on foodgawker of them, I immediately get a craving.

But, since I’m all about making classic meals healthier, I decided to make a twice baked sweet potato. It’s packed with flavor and goodness. They’re super easy to make AND versatile: eat it as a lunch or a delicious side dish.

20120909-123324.jpg

This recipe can also be doubled, tripled, etc. Figure 1 sweet potato per person if it’s the main course for lunch, or if it’s a side, figure 1/2-1 sweet potato per person.

Without further ado, here’s healthy, comforting, twice baked potatoes.

Twice Baked Sweet Potatoes
(Serves 2-4)

2 large sweet potatoes, washed and scrubbed
1/2 c. chopped pancetta or bacon
2 leeks, sliced
2 cloves garlic, minced
1 c. plain, nonfat Greek yogurt
1 c. shredded Gruyere cheese, or a lowfat Italian cheese blend
Salt and pepper

Preheat your oven to 400 degrees.

Poke the sweet potatoes with a fork, about 8 times. Pop into the microwave for about 6-10 minutes on high power until the potatoes are soft (NOT mushy!) to touch. Let sit for 5 minutes.

Meanwhile, in a pan over medium-high heat, cook pancetta or bacon until it just starts to brown. Add in leeks and garlic. Cook until the leeks are soft. Take off the heat.

When the potatoes are done slice them in half and scoop out most of the inside of the sweet potato, leaving about 1/4-1/2″ border. Place on a foil or parchment lined baking sheet.

20120909-123212.jpg

Put the scooped sweet potato into a bowl. Add in the yogurt, 1/2 of the cheese, and the pancetta-leek-garlic mixture. Stir until combined. Add salt and pepper to taste.

Scoop the mixture into the sweet potato shells evenly. Top with the rest of the cheese.

20120909-123245.jpg

Bake about 10-15 minutes, or until the cheese is melted and slightly browned.

Serve and enjoy 🙂

Tagged , , , ,

Grilling Season is Nearing Its End

Hello friends, family and fans! I’ve missed you. Hope you all had a great summer! And hope you all were able to get away from your lives at least a little bit with some sort of vacation 🙂

Sorry for my absence…I took an impromptu summer sabbatical from sitting on my computer. I needed to attempt to recharge my batteries whenever possible after work, getting another kitten and the awful heat of summer. Did I want to sit in front of a computer? Not so much.

So, as I sat here recuperating from the weekend, watching Julie & Julia (how appropriate), having multiple things cooking in the kitchen for the week, and looking out at a gloomy, rainy day, I felt it was time to start back up again.

In honor of the end of summer as most of us know it, I wanted to give you an amazing grilling recipe to finish off the season. I made these awhile back for some guests and they were DELISH.

What is it? Chicken and apricot skewers from my Cooking For Friends Williams-Sonoma cookbook.

20120903-154000.jpg

(You can see why you should soak your skewers for at least an hour… :))

The chicken is marinated in a yogurt and spices to tenderize the chicken. The result? Heaven. This recipe is especially good if you get sick of chicken from time to time (like me). It gives it a distinct and unique flavor that is to die for.

And throwing fruit on the skewer to grill? Amazing. Grilled stone fruit (think plums, apricots, peaches, etc) and pineapple is a fantastic side dish or dessert option for the summer.

Without further ado, here’s how to say adieu to the grill in a new and delicious way 🙂

Grilled Chicken Skewers with Apricots
(Serves 4-6)

3 boneless, skinless chicken breasts, cut into 1 inch cubes
1/2 c. plain, nonfat Greek yogurt
1 tbsp. ground coriander
1 clove garlic, minced
1/2 tsp. cumin, cayenne, and turmeric
4 apricots, cut into 1 inch chunks
1/2 lemon
Olive oil
Salt and pepper

In a bowl, stir together yogurt, coriander, garlic, turmeric, cumin, cayenne, and salt and pepper to taste. Add in cubed chicken. Refrigerate for at least 6 hours or overnight. Put aside your apricots until you’re ready to use them (you can definitely chop them up in advance!).

When you’re ready to grill, soak your skewers (if you’re using wooden ones – I had 10″ inch ones) for at least an hour. Toss your apricot chunks in a tablespoon of olive oil. Thread about 4 chicken cubes and 3 apricot chunks onto each skewer, alternating each.

Place onto a hot grill or grill pan, brushed with olive oil. Cook for 4-5 minutes per side, until nicely charred.

To serve, put on a platter and squeeze a little bit of lemon over the top. Enjoy!

Tagged , , , , , ,

An Easy, Impressive & Delicious Starter

Like I said in my last post, I had some guests over for dinner. I wanted a quick & easy appetizer so I could spend time with my guests. What did I go to for help? My newest cookbook in my collection – Williams Sonoma Cooking For Friends. The one I got from Tim for my birthday!

This starter is a puff pastry pizza-like dish. It has pears, walnuts, rosemary and Gorgonzola cheese. Basically a combination that is mouthwatering before and after your first bite. To make it even better? Drizzle it with a little bit of honey. SO GOOD.

If you want to be adventurous, make your own puff pastry. I wouldn’t even bother though, because there’s great options in your grocery’s freezers. You just have to thaw it according to package directions beforehand.

The cookbook said to cut the sheet in half, roll out a bit and then score the edges. Did I do that? No. Not so much. All I did was lay the sheet out flat on a parchment lined baking sheet & flattened the dough a bit with my fingers. I bet it tasted the same. The directions called to fold over the edge of the puff pastry about 1/2″ to make a border. I think if I did this again (which I will!) I’m not going to make a border and just score 1/2″ of the edge with a fork. I don’t think it really needed the border.

20120626-165848.jpg

Puff Pastry Tart with Pears, Walnuts & Gorgonzola
(Serves 4-6)

1 sheet puff pastry, thawed according to package directions
1 Bosc pear
1/4 c. walnuts, chopped
1 sprig of rosemary, stripped from the stem, finely chopped
1/4 – 1/3 c. Gorgonzola cheese
Honey

Preheat your oven to 400 degrees.

Lay out your thawed puff pastry sheet onto a parchment lined baking sheet. Using your fingers, flatten the dough out slightly, pushing towards the edges to thin out the dough slightly. Fold the edge over about 1/2″ to make a border (optional) then score the edges with a fork.

Cut your pear down the middle lengthwise, then cut in half again lengthwise. Angling your knife, cut out the center of your pear, this will get the core out. Then, slice into 1/4″ slices.

Lay your pear slices however you’d like onto your puff pastry sheet. Sprinkle with walnuts, cheese and rosemary.

Pop in the oven for 20-25 minutes or until the edges of the pastry are browned and puffed up.

Let sit for about 5 minutes, drizzle with honey, slice into desired pieces and enjoy!

Tagged , , , , , ,

Cheesecake Filled Strawberries…Covered in Chocolate!

I recently had some guests over for dinner. I’m planning on sharing each of the recipes with you from the appetizer to dessert, but guess what? I’m starting with dessert!

20120624-145322.jpg

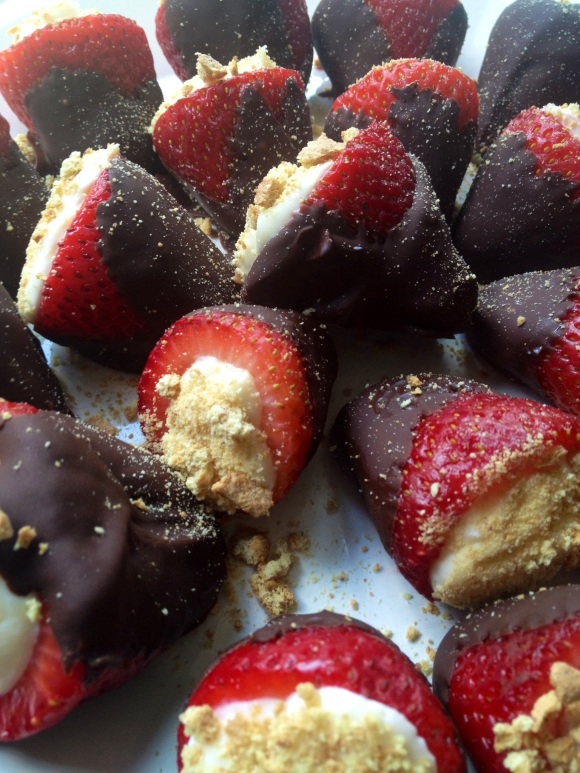
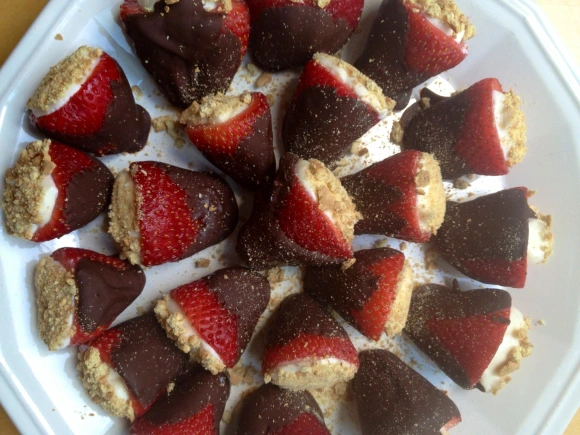
I made chocolate covered strawberries filled with cheesecake! These are no bake (no egg in the filling) and the only time consuming part is hulling out the strawberries. Here’s a little how-to from about.com. The only difference is that you’re going to cut out just a little bit more of the center to fit more filling! Now, I love gadgets but a strawberry huller is something I don’t see the point in buying, but if you have one, use that!

Once you rinse and hull your strawberries it’s super easy to complete. I’d say don’t prepare these more than a day in advance, because once you wash berries, their life on this earth is limited! You can always hull them BEFORE washing about a day before, and make the filling the day before and leave it in a ziploc bag. Then when you need to prepare them, wash, fill, and dip in chocolate.

Now, you don’t have to dip these in chocolate. They would be delicious without it, if you’re a strawberry purist!

The beauty of this recipe is that it can easily be doubled for entertaining at a party (just have a buddy to help you hull!).

20120624-145234.jpg

Chocolate Covered Cheesecake Filled Strawberries
(Makes about 20ish strawberries)

1 lb. fresh strawberries
1 8 oz. package of Neufchatel cheese (reduced fat cream cheese) or regular cream cheese, room temperature
1/4 – 1/3 c. confectioner’s sugar
1 tsp. vanilla extract
1 c. semi-sweet, dark chocolate, or milk chocolate chips
1 regular graham cracker

Wash and hull out your strawberries, throwing out the ones that aren’t a pretty, vibrant red. If they have mushy bad spots, don’t use them!

If you’re preparing your strawberries a day in advance, just hull out the strawberries and wash before filling.

In a stand mixer or using an electric mixture, beat your cream cheese on medium speed for 3-4 minutes until the cheese is fluffy and smooth. Add the confectioner’s sugar and vanilla and beat until combined. I say 1/4-1/3 cup sugar because if you want them a little sweeter, add some more!

Spoon mixture into a large ziploc bag (Tip: Put the ziploc bag into a drinking glass with one of the corners pushed down to the bottom of the glass. This allows you to easily fill with the mixture and puts it right to the corner.) With the bag open, squeeze the filling to the corner of the bag and let the air out. If you’re using this the next day, zip up the bag. If using right away, don’t worry about it. Snip off about 1/2″ of the corner of the bag.

Now, grab a strawberry. Put the tip into the center of the strawberry and squeeze from the top of the filling in the bag. Fill the strawberry until a little bit of the filling is coming out of the strawberry. Repeat until all the strawberries are filled.

In a microwave safe bowl, put your chocolate chips. Microwave in 30 second intervals until the chips soften (probably about 1 minute total), stirring between shifts. Once the chips are softened, stir until they’re a uniform melted goodness.

Grab your filled strawberries. Using tongs or your fingers dip strawberries into chocolate and lay onto a parchment or wax paper lined baking sheet. Repeat until the strawberries are covered.

Refrigerate until the chocolate is set, about 1-2 hours.

Crush up a graham cracker in a ziploc bag using the bottom of the glass. Pour onto a small plate. Dip the exposed cheesecake end of the strawberries into the crushed graham cracker, placing them onto your serving tray. Repeat until done. Sprinkle with remaining graham crackers. Refrigerate until you’re ready to use them!

Enjoy 🙂

Tagged , , , , , ,

Roasted (or Grilled) Veggies & Carb Goodness

First of all, happy father’s day to all the dads out there!

Second of all, here’s a fun recipe that can be made any time of year. Roast vegetables in balsamic vinegar in the oven or toss them on the grill! Summer or winter, this dish is equally delicious.

Third of all, notice a difference on my blog? What do you think of the new header I put together? Yay or nay?

Back to the recipe…

I used a combination of bell pepper, mushrooms, onion, and zucchini. Throwing in some fresh herbs and some chopped Kalamata olives and marinated artichokes gives the dish a tangy bite. Sprinkle with a bit of feta for saltiness and you’re all set to tickle your tastebuds!

Eaten hot or cold, this pasta salad is extremely versatile. A side dish, a lunch or a dinner if you throw in some chicken or beans 🙂 Or these veggies make a delicious side dish on their own, pasta excluded!

20120617-202504.jpg

Roasted Vegetable Pasta Salad
(Serves 4-6)

1 lb. whole wheat penne, fusilli, rigatoni, etc.
1/2 c. balsamic vinegar
2 cloves garlic, chopped
1 orange, yellow or red bell pepper
1 large red onion
2 medium zucchini or yellow squash
8 oz. cremini mushrooms
12 Kalamata olives, halved
1 c. chopped marinated artichoke hearts
1/3 c. feta cheese
2 tbsp. chopped thyme, rosemary, & basil
Juice of 1/2 lemon
Olive oil
Salt and pepper

If you’re going to grill your vegetables, turn the grill to medium. Chop pepper into quarters, slice onions into 1/2″ thick rings (keeping the rings together), slice zucchini into quarters, and keep mushrooms whole. Basically, you’re keeping these veggies in large pieces so they’re easier to grill and they don’t fall through the grates. Toss with garlic, balsamic vinegar and 1/4 cup olive oil. Sprinkle with salt and pepper. Marinate for about 20 minutes. Place pieces on the grill and grill for about 15 minutes, turning halfway through cooking. You want the veggies to have a nice brown coloring on them, but you don’t want the veggies to be falling apart on the grill.

If you’re going to roast the veggies, chop the veggies into 1/2″ pieces, toss with balsamic vinegar, olive oil, garlic, salt and pepper. Place on a rimmed baking sheet. Roast the veggies for about 20-25 minutes in a 400 degree oven, or until the veggies are nice and browned (turning halfway between cooking).

Cook pasta according to package directions. Drizzle with olive oil and stir to keep from sticking. Set aside, covered, to keep warm.

In a large mixing bowl, place pasta and cooked veggies. Toss with 1/4 cup olive oil, lemon juice, artichoke hearts, Kalamata olives, and herbs. Sprinkle with feta cheese before serving. Serve hot, cold or room temperature.

Tagged , , , , , , , , , ,

Asparagus & Goat Cheese Pizza

YUM!

Seriously, this pizza is amazing. I found the recipe in my Williams-Sonoma Weeknight Fresh and Fast cookbook. It’s absolutely delicious and super easy to make. I added some mushrooms to it because 1) I love them and 2) I had some sitting in my fridge!

It’s perfect for lunch, dinner or slice it into smaller pieces for a great appetizer.

For the pizza dough, feel free to use either store bought whole wheat or regular pizza dough, or make your own batch and freeze for when you need it. And to make the clean up easier, I’ve started by putting my dough on the parchment paper that I’ve cut to put on my baking sheet and laying a sheet of plastic wrap on top. Then, roll away! That way, I don’t have to get the kitchen covered in flour. Then, I just transfer the parchment paper with the rolled out dough onto the baking sheet. If you prefer the flouring method, by all means go for it!

I took some help from the store by buying pre-chopped pancetta from Trader Joe’s – if you can’t find pancetta, bacon would work well here too. I also bought sliced portobello mushrooms to save on time.

When picking out asparagus spears, the thinner the better (they’re more tender). You want them to be nice and bright, stay away from brown, wet-looking spears!

20120613-103514.jpg

Asparagus & Goat Cheese Pizza
(Serves 2-4)

1 ball of whole wheat or regular pizza dough
10 spears of asparagus, 1″ of the end trimmed off
1/2 c. diced pancetta or bacon
4 scallions, trimmed and sliced (greens & whites!)
8 oz. creminis, sliced
1/2 c. shredded Italian cheeses (a blend or use mozzarella)
4 oz. goat cheese, crumbled

Preheat your oven to 450 degrees. Cut a piece of parchment to shape your baking sheet. Place your room temperature dough on the parchment sheet.

In a small frying pan, cook the bacon or pancetta until brown over medium-high heat, about 5-8 minutes. Meanwhile, slice your scallions and asparagus. Cut the scallions to about 1/4″ thick. Cut the asparagus into 2″ pieces, cutting on the bias (diagonal).

To roll out the dough, place a piece of plastic wrap similar in size to the parchment paper on top of the dough. Roll out to about 1/4″ thick. Changing directions as you roll each time to really spread it out! Once you’re done, place your dough with the parchment paper onto your baking sheet (the parchment paper keeps it from sticking).

Drizzle about 2 tablespoons of pancetta grease onto your pizza dough, discard the rest, and sprinkle the pancetta or bacon pieces on top. Leave a one inch border. Then, sprinkle the scallions evenly. Next, the mozzarella cheese and goat cheese, then the asparagus and mushrooms.

Pop in the oven for about 15-20 minutes or until the crust is nicely browned to your liking. Let sit for 5 minutes.

Slice into desired servings and enjoy!

Tagged , , , , ,

Sweet and Sour Made Easy

Anyone else LOVE sweet and sour chicken from Chinese restaurants? Thought so. But don’t you feel a little guilty afterwards? Maybe.

Well, this sweet and sour chicken recipe is super easy AND healthier than the fried version. Why? Because it’s made in the crock pot. You can throw all the ingredients together in the morning before work, whip up some rice when you get home, and boom! Delicious and healthy sweet and sour chicken. And I promise you won’t miss the fried!

I found the original recipe from Cooking Classy on foodgawker. I didn’t change too much…mostly just the cooking times, increased the liquids (I like a lot of sauce) and the amount of veggies.

This dish is perfect for the summer, because the crock pot won’t heat up your kitchen. So make this recipe soon!!

20120611-151630.jpg

Slow Cooker Sweet and Sour Chicken
(Serves 4-6)

1 1/2 – 2 lbs. chicken tenderloins
2 c. low sodium chicken broth, plus 1/3 cup
1/2 c. light brown sugar
1/3 c. granulated sugar
1/3 c. rice wine vinegar
Juice of 1 lemon
1/4 c. low sodium soy sauce
3 tbsp. tomato paste
2 garlic cloves, minced
2 tsp. fresh ginger, grated
1/2 tsp. ground black pepper
1/2 – 1 tsp. Sriracha sauce OR 1/4 tsp. red pepper flake (optional)
1 c. diced fresh or frozen pineapple chunks
1 large bell pepper, color of your choosing, diced
1 large yellow or red onion, diced
1/3 c. cornstarch
Sesame seeds for garnish, optional

In your slow cooker, combine the 2 cups of chicken broth, sugars, vinegar, lemon, soy sauce, tomato paste, garlic, ginger, pepper and optional Sriracha or red pepper flake. Stir to combine. Add chicken tenderloins, pineapple, bell pepper, and onion. Combine with the sauce.

Cook on low for 6-8 hours or high for 3-4 hours. About 30-45 minutes before you’re ready to eat, whisk together 1/3 cup of reserved chicken broth and 1/3 cup cornstarch. Pour into the crock pot and gently mix in. The chicken will be tender enough to break up into smaller pieces, but don’t break it up too much! Cook until the sauce thickens, about 30-45 minutes. Serve over white or brown rice. Garnish with sesame seeds, if desired.

Tagged , , , , , , ,

Tzatziki Inspired Chicken Salad

Ever had tzatziki? You can find it in Greek restaurants or even now in your local grocery store. It is a yogurt dipping sauce traditionally made with Greek plain yogurt, lemon juice, dill, garlic, cucumbers, and sometimes mint. It’s absolutely delicious for dipping pita bread or veggies.

I decided to make a chicken salad out of it, because you know how much I like using Greek yogurt as a sub for mayonnaise.

I also put some Kalamata olives for a little salty/tangy bite. For the herbs, I didn’t have any dill around, but I always have mint. So I used a bit of that. It gave the salad a nice, bright, clean flavor! It would also be delicious if you put a little roasted red pepper in there as well, if you so desire.

20120607-130430.jpg

Tzatziki Chicken Salad
(Serves 4)

2 chicken breasts, cooked and diced or shredded
1 – 1 1/2 c. plain, non-fat Greek yogurt
1 small red onion, diced
10 Kalamata olives, diced
1/2 English cucumber, diced into 1/4″ pieces
6 leaves of mint, chopped and/or 2 tbsp. fresh dill, chopped
1 clove garlic, finely minced
Juice of 1/2 lemon
Salt and pepper to taste

In a large mixing bowl, combine all the ingredients. Add the extra 1/2 cup of Greek yogurt if you like your chicken salad a little more wet. Sprinkle in salt and pepper to taste.

Serve with pita bread, eat by itself, or whatever you want!

Tagged , , , , , ,

Happy 100th To Me :)

It’s my 100th post! Hooray!

Thanks to everyone that has supported me, tried out my recipes, started following me, etc. etc. It means so much to me that you guys are enjoying my recipes and blog! Hope you’ve learned a thing or two, and found at least a few new favorite recipes along the way 🙂

I had a lot of recipes in front of this one to be posted, but what’s more appropriate for a celebration than a little cake pie? Not just any ordinary pie. Peanut Butter Mousse Pie! Yum.

The original recipe is from bon appetit. I changed a couple things, added a couple things, and as I don’t have a pie plate (I know, I know) I used a spring form pan (think cheesecake pan). I didn’t think it was enough graham cracker crust to go around a pie plate anyway! So it worked out perfectly. The fun surprise is that between the peanut butter mousse and graham cracker crust is … *drum roll please* a thick and luscious layer of chocolate!

So please make this soon. I promise it’s easy. It can be made a day in advance (I actually made the crust and chocolate layer two days in advance and did the mousse layer the night before) for your convenience.

Yes, I also realize this isn’t the healthiest thing in the world. BUT like my Salted Caramel Pretzel Tart, it’s best for special occasions 🙂

20120605-180124.jpg

Peanut Butter Mousse Pie
(Serves 8-10…depending how you slice it)

For the Crust:

7 graham crackers, coarsely broken
1/2 stick butter, melted
2 tbsp. sugar

For the Chocolate Layer:

1 1/3 c. semisweet chocolate chips
2/3 c. heavy whipping cream
1 tbsp. honey
1 tsp. vanilla extract

For the Peanut Butter Mousse:

1 c. peanut butter chips
3/4 c. heavy whipping cream plus 1 c. for whipping
2 tbsp. creamy peanut butter
1 tsp. vanilla extract
2 tbsp. sugar

For Garnish (optional):

1/4 c. semisweet chocolate chips
1/4 c. peanut butter chips

Preheat your oven to 350 degrees. Spray the bottom of a spring form pan with cooking spray.

Combine graham crackers, melted butter and 2 tablespoons of sugar in a blender or food processor. Blend until the mixture resembles wet sand. Press into the bottom of your prepared pan. Bake the crust for 10 minutes or until the crust is fragrant and lightly browned. Set aside.

Meanwhile, combine chocolate chips, whipping cream, honey and vanilla in a microwave safe bowl. Microwave in 30 second intervals on high until the chocolate softens (shouldn’t take more than 1-2 minutes total). Then stir until the mixture resembles a smooth glossy sauce. Pour over crust and spread out evenly. Freeze for 10 minutes if using right away or refrigerate at this point for up to 24 hours.

To make the mousse, combine peanut butter chips, and 3/4 cup heavy whipping cream in a microwave safe bowl. Heat in the microwave at 30 second intervals (should only take about a minute total) until the chips soften. Whisk until smooth. Whisk in peanut butter and vanilla. Cool until lukewarm.

While the chips are cooling, beat 1 cup of cream with an electric mixer with 2 tablespoons of sugar until soft peaks form (if you take the whisk attachment and stick it in the cream and flip it over, the peak top will fold over a bit; stiff peaks hold their shape). In three additions, carefully fold the peanut butter mixture into the cream. Spoon mousse over chocolate/crust and spread out until even. Chill for at least 1 hour and up to 24 hours in the fridge.

To garnish (optional), melt the chips in separate bowls in the microwave, about 30 seconds. When they soften, stir to create a smooth mixture. Dip a fork slightly in the mixture and splatter on the top! Repeat until you like the look of it. (I bet kids would like this step!) Serve and enjoy!

Tagged , , , , , , ,