Tag Archives: chocolate chips

Cheesecake Filled Strawberries…Covered in Chocolate!

I recently had some guests over for dinner. I’m planning on sharing each of the recipes with you from the appetizer to dessert, but guess what? I’m starting with dessert!

20120624-145322.jpg

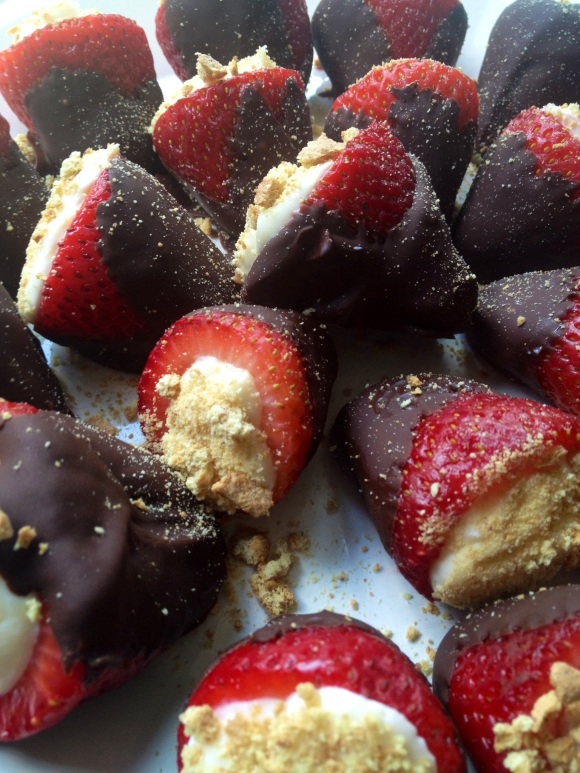
I made chocolate covered strawberries filled with cheesecake! These are no bake (no egg in the filling) and the only time consuming part is hulling out the strawberries. Here’s a little how-to from about.com. The only difference is that you’re going to cut out just a little bit more of the center to fit more filling! Now, I love gadgets but a strawberry huller is something I don’t see the point in buying, but if you have one, use that!

Once you rinse and hull your strawberries it’s super easy to complete. I’d say don’t prepare these more than a day in advance, because once you wash berries, their life on this earth is limited! You can always hull them BEFORE washing about a day before, and make the filling the day before and leave it in a ziploc bag. Then when you need to prepare them, wash, fill, and dip in chocolate.

Now, you don’t have to dip these in chocolate. They would be delicious without it, if you’re a strawberry purist!

The beauty of this recipe is that it can easily be doubled for entertaining at a party (just have a buddy to help you hull!).

20120624-145234.jpg

Chocolate Covered Cheesecake Filled Strawberries
(Makes about 20ish strawberries)

1 lb. fresh strawberries
1 8 oz. package of Neufchatel cheese (reduced fat cream cheese) or regular cream cheese, room temperature
1/4 – 1/3 c. confectioner’s sugar
1 tsp. vanilla extract
1 c. semi-sweet, dark chocolate, or milk chocolate chips
1 regular graham cracker

Wash and hull out your strawberries, throwing out the ones that aren’t a pretty, vibrant red. If they have mushy bad spots, don’t use them!

If you’re preparing your strawberries a day in advance, just hull out the strawberries and wash before filling.

In a stand mixer or using an electric mixture, beat your cream cheese on medium speed for 3-4 minutes until the cheese is fluffy and smooth. Add the confectioner’s sugar and vanilla and beat until combined. I say 1/4-1/3 cup sugar because if you want them a little sweeter, add some more!

Spoon mixture into a large ziploc bag (Tip: Put the ziploc bag into a drinking glass with one of the corners pushed down to the bottom of the glass. This allows you to easily fill with the mixture and puts it right to the corner.) With the bag open, squeeze the filling to the corner of the bag and let the air out. If you’re using this the next day, zip up the bag. If using right away, don’t worry about it. Snip off about 1/2″ of the corner of the bag.

Now, grab a strawberry. Put the tip into the center of the strawberry and squeeze from the top of the filling in the bag. Fill the strawberry until a little bit of the filling is coming out of the strawberry. Repeat until all the strawberries are filled.

In a microwave safe bowl, put your chocolate chips. Microwave in 30 second intervals until the chips soften (probably about 1 minute total), stirring between shifts. Once the chips are softened, stir until they’re a uniform melted goodness.

Grab your filled strawberries. Using tongs or your fingers dip strawberries into chocolate and lay onto a parchment or wax paper lined baking sheet. Repeat until the strawberries are covered.

Refrigerate until the chocolate is set, about 1-2 hours.

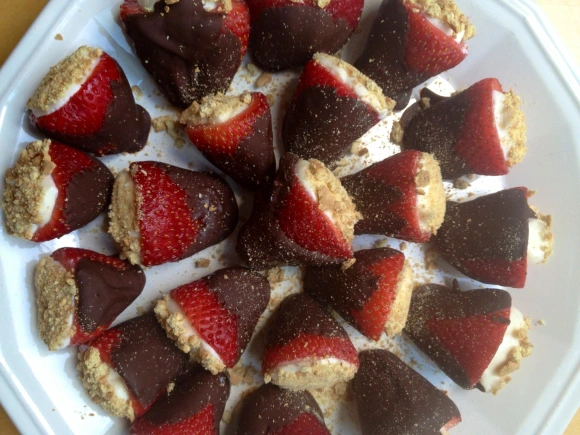
Crush up a graham cracker in a ziploc bag using the bottom of the glass. Pour onto a small plate. Dip the exposed cheesecake end of the strawberries into the crushed graham cracker, placing them onto your serving tray. Repeat until done. Sprinkle with remaining graham crackers. Refrigerate until you’re ready to use them!

Enjoy 🙂

Tagged , , , , , ,

Happy 100th To Me :)

It’s my 100th post! Hooray!

Thanks to everyone that has supported me, tried out my recipes, started following me, etc. etc. It means so much to me that you guys are enjoying my recipes and blog! Hope you’ve learned a thing or two, and found at least a few new favorite recipes along the way 🙂

I had a lot of recipes in front of this one to be posted, but what’s more appropriate for a celebration than a little cake pie? Not just any ordinary pie. Peanut Butter Mousse Pie! Yum.

The original recipe is from bon appetit. I changed a couple things, added a couple things, and as I don’t have a pie plate (I know, I know) I used a spring form pan (think cheesecake pan). I didn’t think it was enough graham cracker crust to go around a pie plate anyway! So it worked out perfectly. The fun surprise is that between the peanut butter mousse and graham cracker crust is … *drum roll please* a thick and luscious layer of chocolate!

So please make this soon. I promise it’s easy. It can be made a day in advance (I actually made the crust and chocolate layer two days in advance and did the mousse layer the night before) for your convenience.

Yes, I also realize this isn’t the healthiest thing in the world. BUT like my Salted Caramel Pretzel Tart, it’s best for special occasions 🙂

20120605-180124.jpg

Peanut Butter Mousse Pie
(Serves 8-10…depending how you slice it)

For the Crust:

7 graham crackers, coarsely broken
1/2 stick butter, melted
2 tbsp. sugar

For the Chocolate Layer:

1 1/3 c. semisweet chocolate chips
2/3 c. heavy whipping cream
1 tbsp. honey
1 tsp. vanilla extract

For the Peanut Butter Mousse:

1 c. peanut butter chips
3/4 c. heavy whipping cream plus 1 c. for whipping
2 tbsp. creamy peanut butter
1 tsp. vanilla extract
2 tbsp. sugar

For Garnish (optional):

1/4 c. semisweet chocolate chips
1/4 c. peanut butter chips

Preheat your oven to 350 degrees. Spray the bottom of a spring form pan with cooking spray.

Combine graham crackers, melted butter and 2 tablespoons of sugar in a blender or food processor. Blend until the mixture resembles wet sand. Press into the bottom of your prepared pan. Bake the crust for 10 minutes or until the crust is fragrant and lightly browned. Set aside.

Meanwhile, combine chocolate chips, whipping cream, honey and vanilla in a microwave safe bowl. Microwave in 30 second intervals on high until the chocolate softens (shouldn’t take more than 1-2 minutes total). Then stir until the mixture resembles a smooth glossy sauce. Pour over crust and spread out evenly. Freeze for 10 minutes if using right away or refrigerate at this point for up to 24 hours.

To make the mousse, combine peanut butter chips, and 3/4 cup heavy whipping cream in a microwave safe bowl. Heat in the microwave at 30 second intervals (should only take about a minute total) until the chips soften. Whisk until smooth. Whisk in peanut butter and vanilla. Cool until lukewarm.

While the chips are cooling, beat 1 cup of cream with an electric mixer with 2 tablespoons of sugar until soft peaks form (if you take the whisk attachment and stick it in the cream and flip it over, the peak top will fold over a bit; stiff peaks hold their shape). In three additions, carefully fold the peanut butter mixture into the cream. Spoon mousse over chocolate/crust and spread out until even. Chill for at least 1 hour and up to 24 hours in the fridge.

To garnish (optional), melt the chips in separate bowls in the microwave, about 30 seconds. When they soften, stir to create a smooth mixture. Dip a fork slightly in the mixture and splatter on the top! Repeat until you like the look of it. (I bet kids would like this step!) Serve and enjoy!

Tagged , , , , , , ,

Chocolate for Breakfast

Yep. Now this isn’t something I do often. But I thought it would be appropriate to make these Valentine’s Day morning!

I found the original recipe on foodgawker, of course. I tweaked the ingredients based on what I had, and added some dark chocolate chips to make it even MORE chocolatey! I also doubled the recipe because I was making them for two 🙂

I guarantee if you have kids, they’ll love these for breakfast! And they’re not super unhealthy, in fact, you get to sneak in some whole grains in a low fat, decadent breakfast.

My pancakes were topped with light whipped cream, but you could also use powdered sugar, chocolate syrup, or peanut butter. Go nuts!

20120302-132119.jpg

Chocolate Pancakes
(Makes about 8-10 3″ pancakes)

1/2 c. spelt, whole wheat or all purpose flour
1/2 tsp. baking powder
2 tbsp. dutch cocoa powder
2 tbsp. honey (or 1 1/2 packets stevia)
1/8 tsp. salt
1 1/2 tbsp. applesauce or oil (I used regular olive oil – no extra virgin here!)
2 tsp. vanilla extract
2/3 c. milk of choice (minus 1 tbsp)
1/3 c. dark chocolate chips
Optional toppings: whipped cream, powdered sugar, peanut butter, syrup, chocolate syrup, butter, etc.

Heat a large frying pan over medium high heat. When water sprinkled onto the pan bubbles, it’s ready to go!

Mix dry ingredients together in one bowl. Mix wet ingredients together in another bowl. Combine wet into dry until just mixed then fold in chocolate chips.

Spray the pan with cooking spray just before use. Turn the pan down to medium heat. Use about 1/4 c. batter for each pancake. They’re ready to flip when the edges bubble and start to look dry. The second side only needs a minute or two!

Serve immediately, or keep warm in the oven until ready to use.

Tagged , , , , ,